Chapter 1.11 - Docker Swarm - Orchestrate Your Containers with Ease
Docker Swarm, powered by SwarmKit, is Docker Engine’s native clustering and orchestration solution. As one of Docker’s core projects, it’s central to providing container cluster services and supporting the broader Docker ecosystem.
Docker Swarm allows you to transform multiple Docker hosts into a single, large virtual Docker host, enabling the rapid creation of a container cloud platform. Swarm mode includes built-in key-value storage and offers a host of powerful features such as fault-tolerant decentralized design, integrated service discovery, load balancing, routing mesh, dynamic scaling, rolling updates, and secure transport. These capabilities allow native Docker Swarm clusters to effectively compete with orchestrators like Kubernetes.
Before diving into Docker Swarm, let’s understand some fundamental concepts.
Core Concepts
Nodes
Any Docker-enabled host can either initialize a new Swarm cluster or join an existing one, thereby becoming a node within that Swarm. Nodes are categorized into two types: manager nodes and worker nodes.
- Manager Nodes: These nodes are responsible for managing the Swarm cluster. Most
docker swarmcommands can only be executed on manager nodes (thedocker swarm leavecommand is an exception and can be run on worker nodes). A Swarm cluster can have multiple manager nodes, but only one is elected as the leader using the Raft consensus protocol. The leader is responsible for making all scheduling decisions and maintaining the desired state of the cluster. - Worker Nodes: These are the execution nodes for tasks. Manager nodes dispatch services to worker nodes for execution. By default, manager nodes also act as worker nodes, meaning they can run tasks. However, you can configure services to run exclusively on worker nodes or even specific manager nodes.
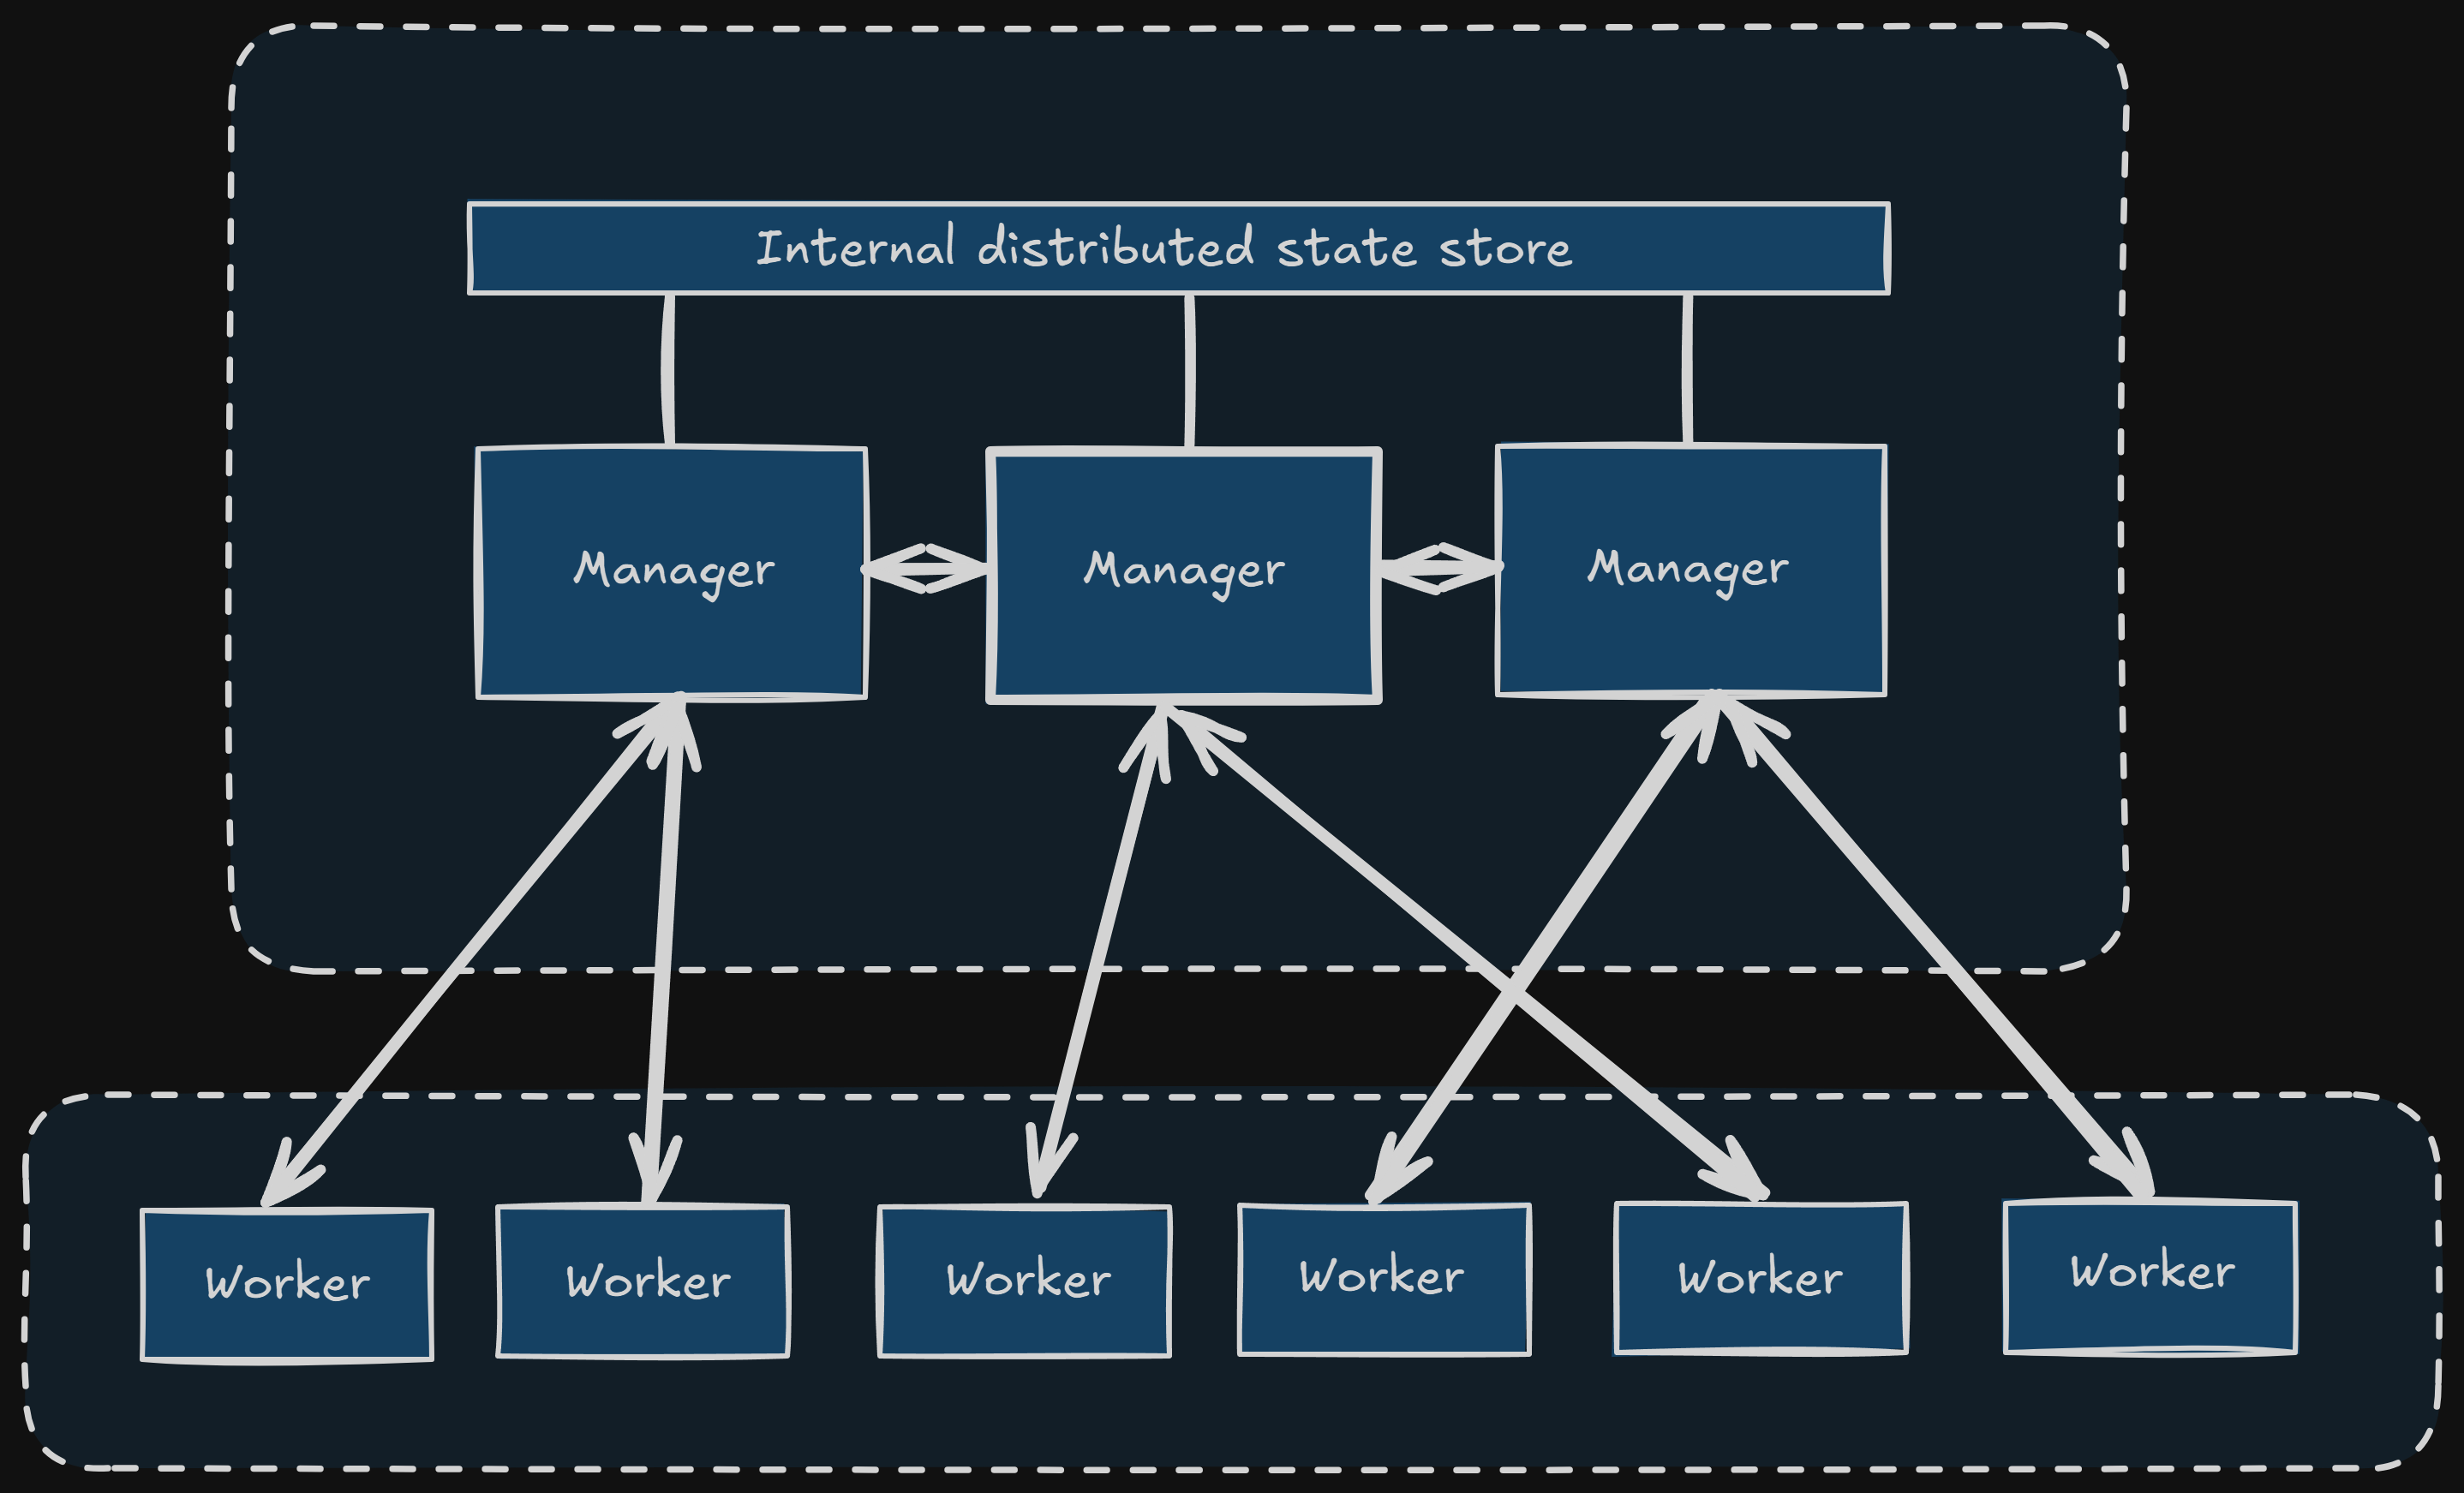
Services and Tasks
- Task: In Swarm, a task is the smallest schedulable unit, essentially representing a single running container.
- Service: A service is a collection of tasks that define the properties and behavior of your applications within the Swarm. Services come in two primary modes:
- Replicated Services: These services run a specified number of identical tasks across various worker nodes, distributing the workload.
- Global Services: These services run exactly one task on every available worker node in the Swarm, suitable for agents or monitoring tools that need to be present on all nodes.
You specify the service mode using the --mode parameter with the docker service create command.
Setting Up a Docker Swarm Cluster
For this guide, we’ll use docker-machine to simulate our Swarm hosts. While docker-machine is less commonly used for production Swarm deployments today (as most setups involve cloud VMs or bare metal servers directly), it’s excellent for demonstration and learning.
Initialize the Manager Node
First, let’s create our manager node and initialize the Swarm cluster on it.
# Create a virtual machine for the manager
docker-machine create -d virtualbox manager

# Configure your shell to connect to the manager's Docker daemon
eval $(docker-machine env manager)

# SSH into the manager node and initialize the Swarm
# Replace 192.168.99.101 with the IP address of your manager machine.
# You can find this IP by running `docker-machine ip manager`.
docker-machine ssh manager 'docker swarm init --advertise-addr $(docker-machine ip manager)'
The docker swarm init command automatically makes the node where it’s executed a manager node. The output will provide a docker swarm join command for adding worker nodes. Copy this command, as you’ll need it for the worker nodes.
Note: Always use the actual IP address of the manager node for --advertise-addr. This ensures other nodes can correctly connect to the manager.
Add Worker Nodes
After initializing the manager, create additional docker-machine instances to act as worker nodes and join them to the Swarm.
# Create a virtual machine for worker1
docker-machine create -d virtualbox worker1

# Configure your shell to connect to worker1's Docker daemon
eval $(docker-machine env worker1)

# SSH into worker1 and join the swarm using the command from the manager's initialization output
# Replace the token and IP with the actual values from your manager's output.
docker-machine ssh worker1 'docker swarm join --token SWMTKN-1-xxxxxxxxxxxxxxxxxxxxxxxxxxxxxxxxxxxxxxxxxxxxxxxxxxxxxxxxxxxx 192.168.99.101:2377'

# Repeat for worker2
docker-machine create -d virtualbox worker2
eval $(docker-machine env worker2)
docker-machine ssh worker2 'docker swarm join --token SWMTKN-1-xxxxxxxxxxxxxxxxxxxxxxxxxxxxxxxxxxxxxxxxxxxxxxxxxxxxxxxxxxxx 192.168.99.101:2377'
You’ll see a message like “This node joined a swarm as a worker.” confirming the successful addition.
Inspecting the Swarm Cluster
Now that we have a basic Swarm cluster (one manager, two workers), let’s inspect its status.
Ensure your shell is connected to the manager node:
eval $(docker-machine env manager)
View Swarm Nodes
To see all nodes in your Swarm and their status:
docker node ls
You should see an output similar to this (Engine Version will be much newer):
ID                            HOSTNAME            STATUS              AVAILABILITY        MANAGER STATUS      ENGINE VERSION
<manager-id> * manager             Ready               Active              Leader              26.1.4
<worker1-id>                  worker1             Ready               Active                                  26.1.4
<worker2-id>                  worker2             Ready               Active                                  26.1.4
- The
*next to the manager ID indicates it’s the current node you’re connected to. Readystatus means the node is healthy and part of the Swarm.Activeavailability means the node is available for task scheduling.Leaderindicates the current manager leader.
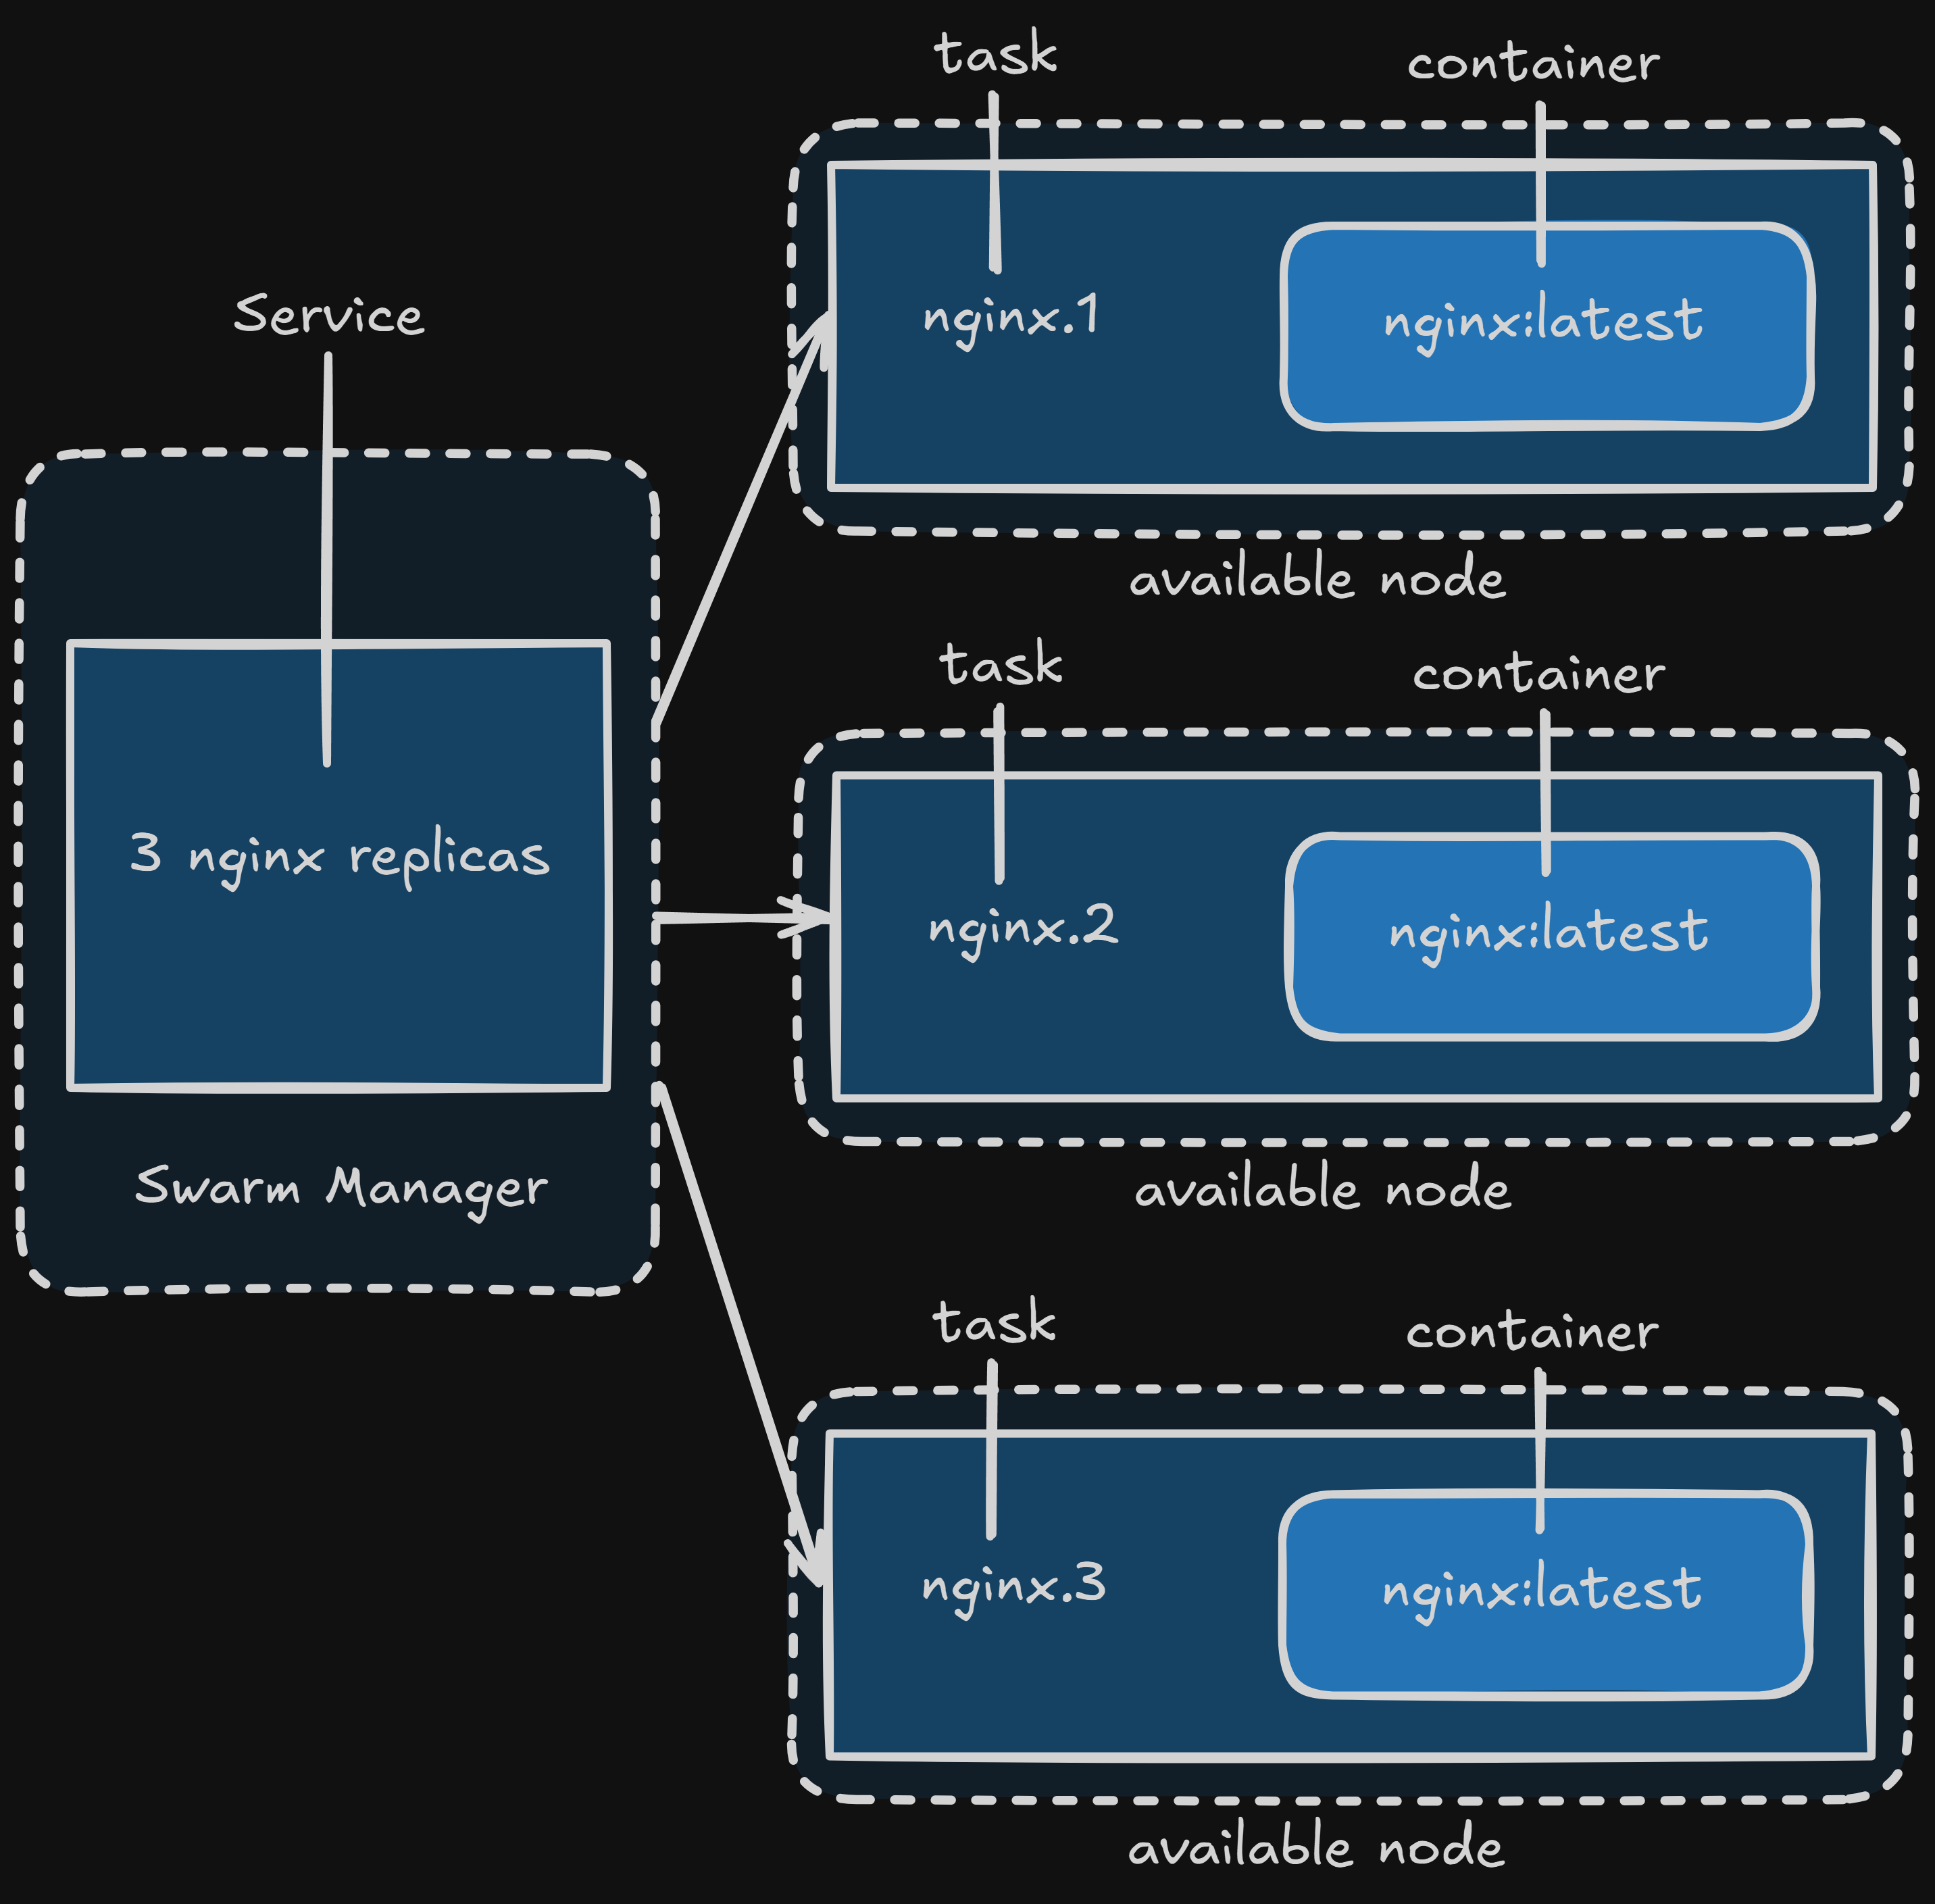
Deploying a Service
Let’s deploy a simple Nginx service to our Swarm. We’ll use a recent and stable Nginx image.
docker service create --replicas 3 -p 80:80 --name nginx nginx:stable-alpine
--replicas 3: This tells Swarm to maintain 3 instances of the Nginx container. Swarm will distribute these across your available worker (and manager, by default) nodes.-p 80:80: Publishes port 80 of the service to port 80 on any node running a task for this service. Swarm’s routing mesh handles load balancing requests across the service’s tasks.--name nginx: Assigns the name “nginx” to our service.nginx:stable-alpine: Specifies the Docker image to use for the service.stable-alpineis a good choice for production due to its small size and stability.
You’ll see progress as Swarm deploys the tasks.
View Services
To list all services running in your Swarm:
docker service ls
Output:
ID                  NAME                MODE                REPLICAS            IMAGE                 PORTS
<service-id>        nginx               replicated          3/3                 nginx:stable-alpine   *:80->80/tcp
The 3/3 under REPLICAS indicates that 3 desired tasks are running out of 3.
View Service Tasks
To see which nodes are running the tasks for a specific service:
docker service ps nginx
Output:
ID                  NAME                IMAGE                 NODE                DESIRED STATE       CURRENT STATE           ERROR               PORTS
<task-id-1>         nginx.1             nginx:stable-alpine   worker1             Running             Running X minutes ago
<task-id-2>         nginx.2             nginx:stable-alpine   worker2             Running             Running X minutes ago
<task-id-3>         nginx.3             nginx:stable-alpine   manager             Running             Running X minutes ago
This shows which node each task of the nginx service is running on.
Accessing Service Logs
To view the aggregated logs for all tasks belonging to a service:
docker service logs nginx
Removing a Service
To remove a service from the Swarm:
docker service rm nginx
This will stop and remove all tasks associated with the nginx service.
Deploying Multiple Services with Docker Stack
Just as you use docker-compose.yml to define and manage multiple interdependent containers, in Docker Swarm, you use a Compose file (often named docker-compose.yml or a more specific stack.yml) with docker stack commands to deploy multiple interconnected services. This allows you to deploy entire applications as a single unit.
Let’s illustrate by deploying a WordPress application, which typically involves both a WordPress service and a database service.
Create a file named docker-compose.yml (or stack.yml) with the following content:
version: "3.9" # Use the latest Compose file format for Swarm compatibility

services:
  wordpress:
    image: wordpress:latest # Use latest for demonstration, consider a specific version for production
    ports:
      - "80:80"
    networks:
      - overlay
    environment:
      WORDPRESS_DB_HOST: db:3306
      WORDPRESS_DB_USER: wordpress
      WORDPRESS_DB_PASSWORD: wordpress_password # Use a strong, unique password in production
    deploy:
      mode: replicated
      replicas: 3
      restart_policy: # Best practice: Define restart policies for robustness
        condition: on_failure
      update_config: # Best practice: Control rolling updates
        parallelism: 1
        delay: 10s
        failure_action: rollback
        order: start-first

  db:
    image: mysql:8.0 # Use a recent stable MySQL version
    networks:
      - overlay
    volumes:
      - db-data:/var/lib/mysql # Persist database data
    environment:
      MYSQL_ROOT_PASSWORD: secure_root_password # Change this to a strong password!
      MYSQL_DATABASE: wordpress
      MYSQL_USER: wordpress
      MYSQL_PASSWORD: wordpress_password # Must match the wordpress service's password
    deploy:
      placement:
        constraints: [node.role == manager] # Pin DB to manager for simplicity, but consider dedicated storage for production
      restart_policy:
        condition: on_failure
    # Best practice: Don't expose database ports directly to the outside unless absolutely necessary.
    # It's better to access it internally by other services in the overlay network.

  visualizer:
    image: dockersamples/visualizer:latest # Use latest for demonstration
    ports:
      - "8080:8080"
    volumes:
      - "/var/run/docker.sock:/var/run/docker.sock" # Allows Visualizer to read Docker events
    deploy:
      placement:
        constraints: [node.role == manager] # Pin Visualizer to manager
      restart_policy:
        condition: on_failure

volumes:
  db-data: # Define the named volume for database persistence

networks:
  overlay: # Define the overlay network for inter-service communication
    driver: overlay
    attachable: true # Allows standalone containers to join if needed
Key Enhancements and Best Practices:
version: '3.9': Using the latest Compose file format (3.9) ensures compatibility with the latest Docker Swarm features.- Specific Image Versions: While
latestis used for demonstration, in production, always pin to a specific, immutable image version (e.g.,wordpress:6.5.4-php8.2-apache,mysql:8.0.37). This prevents unexpected breaking changes. - Strong Passwords: Emphasize using strong, unique passwords for production deployments.
restart_policy: Crucial for service resilience.on_failureensures a task is restarted if it exits with a non-zero status.update_config: Essential for controlled rolling updates.parallelism: How many tasks to update at once.1is safest.delay: Pause between updating tasks.failure_action: What to do if an update fails (rollbackorcontinue).order: Whether tostart-first(new task before stopping old) orstop-first.start-firstprovides better uptime during updates.
- Named Volumes (
db-data): Used for persistent storage of database data. This is critical to prevent data loss if the database container is restarted or moved. - Overlay Networks:
driver: overlay: The standard network driver for Swarm services, enabling communication across nodes.attachable: true: Allows standalone containers (not part of a service) to join this network, which can be useful for debugging.
placement.constraints: Used to control where services are deployed.node.role == manager: This pins thedbandvisualizerservices to run only on manager nodes. While convenient for this example, for a highly available database in production, you’d typically use dedicated storage solutions (e.g., cloud block storage, shared file systems, or a database cluster) rather than pinning to a single manager node. The Visualizer is fine on a manager.
- No Exposed DB Ports: By default, the
dbservice doesn’t expose any ports to the host (ports:section is omitted). This is a security best practice, as thewordpressservice can communicate withdbdirectly over theoverlaynetwork using its service name (db). - Docker Samples Visualizer: The
visualizerservice provides a web-based interface (accessible on port 8080 of a manager node) to visualize your Swarm cluster’s services and their placement.
Save this docker-compose.yml file on your manager node.
Deploying the Stack
To deploy the services defined in your docker-compose.yml file as a stack:
docker stack deploy -c docker-compose.yml wordpress
docker stack deploy: The command for deploying multi-service applications on Swarm.-c docker-compose.yml: Specifies the Compose file to use.wordpress: This is the stack name. All services defined in the Compose file will be prefixed with this name (e.g.,wordpress_wordpress,wordpress_db,wordpress_visualizer).
Viewing Stacks
To list all deployed stacks in your Swarm:
docker stack ls
Output:
NAME                SERVICES
wordpress           3
Removing a Stack
To remove all services and networks associated with a stack:
docker stack rm wordpress
Output:
Removing service wordpress_db
Removing service wordpress_visualizer
Removing service wordpress_wordpress
Removing network wordpress_overlay
Removing network wordpress_default
Important Note on Data Volumes: The docker stack rm command does not remove any data volumes created by the services in the stack (e.g., db-data). If you wish to remove these volumes, you must do so explicitly using docker volume rm:
docker volume ls # To list all volumes
docker volume rm wordpress_db-data # Assuming the volume was named wordpress_db-data by the stack